Mockmill 100 Grain Mill

I had been making our sourdough bread weekly for over four years now and I was curious to see if grinding my own flour is worth it. I know for a fact that since the pandemic hit a couple of years ago, it was difficult to find specialty flours and it is very expensive if you ever found it.

For a while, I did have to use whatever I could find, when I could find it – store brand, bleached, all purpose flour, usually – and I learned that they are good enough for most of the things that I bake. Something good to know!

But as more items become readily available again, I want to try to get better ingredients for my family. A grain mill sounded like a great idea since I already had a place to order my organic grains in bulk – Azure Standard! Check them out online 👉https://www.azurestandard.com

Looking up the various types of flour mills online, I fell in love with the Komo Classic. It had this beautiful, wood cabinet casing and looked like it was easy enough to use. Even though it was $600, I placed it in the cart and started checking out.

But they were not available. No unit of whatever brand was available as they were all back ordered for several months. Looks like everyone was already doing what I was thinking of doing!

A few weeks later, I found a similar one in Amazon, a MockMill 100. Not as pretty as the KoMo but more practical AND available NOW! I purchased it before I could think of reasons not to. Its cheaper than the KoMo, about $375 with taxes and shipping.

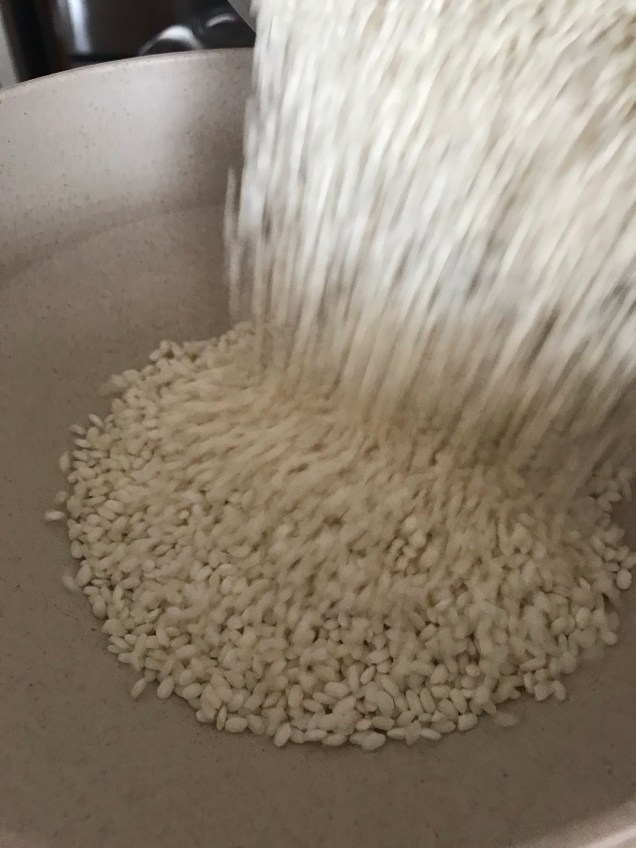
It arrived a week later and I did run a variety of grains and beans through it to see how it handles it. Rice first to clean it out, then black beans, soybeans, garbanzo, wheat, millet, oats…it was really good! 😊

Reading up on this brand, I found out that there is another, more powerful one called MockMill 200. Debating to return this for the 200, I emailed the seller asking how much better the 200 is over this and they replied that the only difference is the speed of grinding. I can live with the speed of the 100 as I am not a commercial bakery. So I decided to just keep this unit and use it until I outgrow it.

I would likely use it more often for specialty flours, garbanzo, rice, beans than regular flour but it’s handy having it that I did buy wheat to mill at home.

Let me tell you, the taste of bread made with fresh milled flour is out of this world! You have to cool down the flour a bit after grinding as it gets quite warm.

I think even if I can get good quality flour, I might still grind my own every now and then.

Follow me on Facebook: https://www.facebook.com/At-Home-With-Theresa-100255438410727/

Tonkatsu (Breaded, Fried Pork Chops)

My all time favorite dish!

Call it whatever you want, schnitzel, milanesa, katsu…I always go with what I called it growing up-TONKATSU. And it has to be pork chops! Chicken is only acceptable to me when I have no other choice. 😊

Served with very thinly sliced cabbage, freshly cooked white, sticky rice, and of course the essential Bulldog sauce (no, it is NOT made with bulldogs!), I am a happy camper! I can really eat this everyday and I won’t get tired if it!

My mom, being Japanese, used to make this when we were little. It is definitely a comfort food for me and my family. My son actually loves this as much as do so even if I try to avoid serving fried dishes, I do oblige and make this once in a while. I always top the cabbage with Kewpie mayo too!

Of course, this is also the perfect “milanesa” to top my Peruvian Tallarin Verde. But more about that in my later article!

You’ll need pork chops. As much as you like!

I marinate them in lemon juice and fish sauce if I have time. Equal parts of lemon juice and fish sauce will make your pork chops taste really good, not fishy at all! Leave them in your refrigerator, covered, for a few hours, ideally overnight.

If you’re pressed for time, just salt and pepper them. It’ll taste good too!

You’ll also need flour. I start with about a cup of flour in a plate, and mix in a pinch or two of salt and pepper. This will be your first coating on the pork chops.

Next, you’ll need an egg or two mixed with 1-2 tablespoons of water. Beat that well in another plate. This is your second coating.

Panko. Japanese bread crumbs. This will turn your pork chops into Tonkatsu.

Grab a bag, open, and pour some into a clean plate. A third plate. One for the flour mixture, one for the egg mixture, and one for the panko. Yup, this is your final coating before frying. 😋

Step 1: place a pork chop into the flour mixture, lightly press down on it to coat with flour,

Step 2: Turn over and coat the other side well.

Step 3: transfer to the egg mixture, coat well.

Step 4: turn pork over to coat the other side too.

Step 5: move on to the panko, coating one side thoroughly,

Step 6: turn over and press pork onto the panko to coat the other side. Repeat with remaining pork chops.

Step 7: heat a good amount of canola oil in a fry pan over medium heat.

Step 8: When hot, slide a couple of pork chops in. Let cook for about 3-4 minutes.

Step 9: Carefully turn over to cook the other side. I find this is easiest done with a metal kitchen tong.

Step 10: cook the other side until golden snd meat is cooked through.

Step 11: carefully remove tonkatsu onto paper towel lined plate or wire rack.

Step 12: thinly slice a small head of cabbage. Rinse in cool water snd drain thoroughly.

Step 13: arrange tonkatsu, cabbage, and rice on s plate.

Step 14: serve with Bulldog sauce snd Kewpie mayo! Enjoy!!!

Follow me on Facebook: https://www.facebook.com/At-Home-With-Theresa-100255438410727/

Electric Lunchbox #99: Mangoes with Sticky Rice

This is a very delicious dessert typically found in Southeast asian countries. Rice is a staple eaten 3 times a day in that part of the world – plus for dessert/snack too! Mangoes with Sticky Rice is a simple treat but truly memorable and I know that I crave it often, specially when I see ripe, super fragrant, mangoes at the grocery store.

There are several variations of this Sticky Rice in Asia.

In the Philippines where I grew up, my aunts would wrap the rice mixture in banana leaves then tie them up in pairs before boiling it until the rice is done. They would serve these “Suman” as our midday snack, dipped in sugar, topped with ube halaya, or fried and topped with more sugar. There is also Biko, which is sweetened sticky rice and coconut milk, baked in a pan and topped with caramelly coconut jam. Another of my very favorite sweet!

I tried it served as this recipe is, with a side of mangoes and decorated with an orchid flower, in Singapore. 😋

When there are ripe mangoes available, they are THE perfect partner to this simple Sticky Rice dessert. Just make sure the mangoes are perfectly ripe!

To add more ooomph to this already yummy dessert, I added a drizzle of some Coconut Rum just before serving. I personally do not drink alcohol but somehow I love baking with it! As is evidenced by this recipe, and my famous Rum Cake recipe: https://athomewiththeresa.com/2020/11/16/electric-lunchbox-bacardi-rum-cake/.

This dessert is something I’d gladly skip lunch or dinner for.

It is easy to make and sure to impress! I hope you try it!

*NOTE that this recipe uses regular sized measuring cups, NOT the tiny ELB cup, unless specified.*

Follow me for more recipes for the ELB!

See Itaki’s offerings here! https://www.itakico.com/theresa

Follow me on Facebook: https://www.facebook.com/At-Home-With-Theresa-100255438410727/

Ingredients:

1 cup sticky rice – I use Botan brand sweet rice🔝

2/3 cup canned coconut milk

1 1/2 to 2 tablespoons granulated sugar

1/4 teaspoon salt

2 large ripe mangoes, cut from the pit and scooped out

1 1/2 tablespoons coconut rum, more if desired 😉

Procedure:

1. Place measured rice in a fine strainer and rinse under cold water until water runs clear, running your fingers through it to help in rinsing it.

2. Place rice in a bowl, cover with plenty of water and let soak for 4-12 hours.

3. Drain rice and place in the big bottom bowl of your ELB. Place this bowl, uncovered, in the ELB base.

See the difference in size? The one on the right is straight from the bag and the one on the left is after the rice was soaked overnight.

4. Place 3 ELB cups of water in the base, cover and let steam for about 1 hour, until your lunchbox shuts off.

5. Carefully open the ELB and fluff rice with a fork. Cover loosely and set aside.

6. In a small bowl, combine coconut milk, sugar, and salt.

7. Mix until sugar is completely dissolved.

8. Pour mixture onto the hot rice.

9. Place the bowl back in the ELB, add 1 ELB cup of water to the base, cover and let steam until done, about 15 minutes more.

10. Carefully open the ELB and stir the rice. Check to see if rice is done by tasting some. The best part, right? Adjust sweetness if needed by adding more sugar if you like. A reminder though that the mangoes will add sweetness to the dish too.

11. Slice each mango half into thin, lengthwise pieces. ⬇️

12. Mound rice on a serving plate and arrange mango slices around it, or on top of the rice. *I used a small cup to shape the rice into a small dome. Just scoop some rice into a clean, dry cup, level the top while gently packing the rice in. DO NOT pack too much as you want it fluffy, just enough to hold its shape. You could also just scoop some rice onto the plate and top with mangoes. It’ll still be delicious!

13. Pour coconut rum over and serve.

14. Sit back, put your feet up, and enjoy every bite!

Spicy Eggplant

Spicy Eggplant…this is one of my favorite dishes to order when eating out at an Asian restaurant. Of course with COVID-19 I had been cooking almost all of our meals at home for over a year.

Most of the meals I like to eat are easily made at home so I just had to recreate this recipe too as I have been craving spicy, salty, sweet foods lately. Must be because we are in this pandemic longer than anyone thought we would. This dish checks all the boxes – spicy, sweet, and salty – truly delicious with plain steamed rice. As a bonus, you get your veggie serving in there too!

You can make this vegetarian by cooking it as it is but my boys like meat and frowns if they cannot find meat in their plate so I did add a couple of handfuls of chopped meat in there. You can also make it spicier buy adding more chili paste. As always, feel free to tailor my recipes to your tastes!

Follow me on Facebook: https://www.facebook.com/At-Home-With-Theresa-100255438410727/

For the Sauce:
2 tablespoons oyster sauce
2 tablespoons soy sauce
2 tablespoons water
1 tablespoon plain white vinegar
1 tablespoon brown sugar
1 teaspoon chili paste (sambal oelek)
1/2 teaspoon ground bean sauce (or hoisin sauce)
1/2 teaspoon sesame oil

To finish cooking:
1 tablespoon canola oil
1 pound eggplant, peeled, cut into 1-inch cubes
1 teaspoon garlic, minced
1 tablespoon cornstarch
2 tablespoons water

*I added about 200 grams chopped pork to this recipe when I was taking photos of it for this article. You can leave it out if you want, but it sure makes it taste better!*

1. Prepare the sauce by combining all the ingredients in a small bowl and mixing well. Set aside.

2. Heat oil in a wok to 350 degrees F.

3. Add the diced eggplant and cook, stirring once, for about one minute. Remove the eggplant with a slotted spoon and set on paper toweling to drain.

4. Remove all but about a teaspoon of oil from the wok. Turn the heat to high and add the garlic.

5. Add the chopped pork and let it brown for a few minutes.

6. Carefully pour in the sauce.

7. Let the sauce come to a simmer for 30 seconds.

8. Add the eggplant back to the wok and cook for 10-15 seconds while stirring.

9. Combine the cornstarch,

10. and water to make a smooth paste.

11. Stir it into the eggplant mixture.

12. Keep stirring until it thickens.

13. Let it come to a boil and simmer for 2-3 minutes.

14. Serve hot with lots of steamed white rice.

15. Enjoy!

Trader Joe’s Thai Style Yellow Curry Sauce

I love the convenience of bottled simmer sauces that are becoming available at the grocery stores. They are truly life savers for when you come home late from work and need something on the dinner table real quick. The trick is finding out which ones you like, which means trying out a few brands.

I’ve always been lucky with almost anything I get at Trader Joe’s. They’re reasonably priced and always delicious, but sometimes you get hooked but you can never get it again. I had some favorite cheeses and sauces that was not available anymore when I came back for more. Sad.

So if I see something I want to try, I usually buy a couple to start with. They do have expiration dates so I cannot really get a dozen or so as we will get tired of it if I cook it too often. 😊

So…this is my most recent find!

I’ll cook this with some cut up chicken, garlic, onions, carrots, potatoes, zucchini, mushrooms, and a couple of bell peppers from the garden.

You can definitely eyeball the amounts and adjust anything to your taste.

Follow me on Facebook: https://www.facebook.com/At-Home-With-Theresa-100255438410727/

Begin by preparing all of your ingredients. I used the following:

1-2 tablespoons oil

3 garlic cloves, peeled and minced

1 onion, peeled and diced

1 pound of chicken breast, cubed

1 big potato, peeled and diced

1 carrot, peeled and diced

1 zucchini, trimmed and cut into half moons

A handful of mushrooms, chopped

1 red bell pepper, diced

1 bottle of Trader Joe’s Yellow Curry Sauce

Water

Freshly cooked rice and chopped cilantro, for serving

1. Heat oil in a saucepan. Sauté garlic and onions until lightly browned and fragrant, about 5 minutes.

2. Add the chicken and cook until lightly browned. Next add the potatoes and carrots. Stir and cook for a few minutes.

3. Add the zucchini, mushrooms, and bell pepper.

4. Pour the curry sauce over. Fill the bottle halfway with water, cover and shake to get every last bit of the delicious sauce, open the bottle then pour contents into the pan.

5. Stir the mixture and cover with a lid. Lower heat to medium low and simmer until chicken and vegetables are done, around 10-20 minutes.

6. Serve over freshly cooked, hot rice. Top with chopped cilantro. Enjoy!

Electric Lunchbox #91: Strawberry Nesquick Mochi

I always have this big can of Nesquick Strawberry mix as my son loves it mixed in his morning mug of milk. I started buying it when I was pregnant, as I didn’t like chocolate then, so was happy to see they offered it in strawberry flavor! It was the only way i could drink milk then. I guess it got passed on to my son! 😊

When I was making the mochi recipes for the ELB, I happened to see the can of Nesquick and immediately thought of using it as flavoring. And here is the result of the experiment!

I would add more Nesquick next time as the flavors and color was minimal. Otherwise, the mochi was chewy, sweet, and delicious enough for a snack.

*NOTE that this recipe uses regular sized measuring cups, NOT the tiny ELB cup, unless specified.*

Follow me for more recipes for the ELB!

See Itaki’s offerings here! https://www.itakico.com/theresa

Follow me on Facebook: https://www.facebook.com/At-Home-With-Theresa-100255438410727/

Ingredients:

1/2 cup mochiko rice flour

1/4 cup sugar

2- 3 tablespoon Nesquick Strawberry drink powder

1/2 cup water

Katakuriko or cornstarch for dusting

Procedure:

1. In a bowl, mix rice flour,

2. Sugar,

3. Nesquick powder,

4. And water,

5. Mix well until blended.

6. The mixture will be thin, see photo below.

7. Spray the medium or large ELB bowl with nonstick spray.

8. Pour mochi mixture into the bowl. Cover with foil and place in the ELB base. Pour 3 ELB cups of water in the base, cover and let steam until it shuts off, about an hour.

9. Carefully open the ELB, and check if mochi is set. Add more water to the base and steam longer if needed.

10. Dust the top with katakuriko or cornstarch.

11. Turn out onto a plate dusted generously with katakuriko or cornstarch.

12. Using a plastic knife, cut mochi into bite sized pieces.

13. Dust with more katakuriko or cornstarch to prevent sticking.

14. Enjoy!

Electric Lunchbox #87: Minestrone

It’s been cold this week here in Southern California so when I told my husband that I do not have any ideas on what else to make in the ELB, he said “soup!”

He went on naming different soups he grew up eating in Peru…and I stopped him when i heard Minestrone. I love Minestrone and I haven’t made it in a long time!

When I was a high school student at Herbert Hoover High in Glendale, CA, I chose a cooking/baking as my elective class. Not only as a way to nurture a life skill/hobby, but also to rest my brain between classes. And the basic Minestrone I make all these years always comes back to the recipe I learned in Mrs. Baker’s class.

So here it is! The original recipe I scribbled down when I was 15 years old – sure brings back a lot of memories! I didn’t even have to scale it down for the big ELB bowl as it fits perfectly!

Do not feel like you have to follow the recipe to the letter. Any bean or veggie you want, or have on hand, can be used instead of the ones listed in the recipe but I do encourage you to try the recipe as it is at least once. Then you can make adjustments after you’ve tried the recipe as is.

*NOTE that this recipe uses regular sized measuring cups, NOT the tiny ELB cup, unless specified.*

Follow me for more recipes for the ELB!

See Itaki’s offerings here! https://www.itakico.com/theresa

Follow me on Facebook: https://www.facebook.com/At-Home-With-Theresa-100255438410727/

Ingredients:

2 tablespoons onions

1 tablespoon butter

1 tablespoon cornstarch

2 tablespoons tomato paste

1 tablespoon rice

1 tablespoon small pasta

1 tablespoon canned beans

1/2 cup peeled and diced potatoes

1 tablespoon green peas (used celery as I was out of green peas)

Salt and pepper

A few rosemary leaves

3/4 cup beef broth

2/3 cup water

Procedure:

1. Place the chopped onions in the big ELB bowl.

2. Add the butter,

3. Cornstarch,

4. Tomato paste,

5. Rice,

6. Pasta

7. Beans,

8. Potatoes,

9. Celery or green peas

10. Add a generous pinch of salt and pepper, and the rosemary leaves,

11. Add the beef broth and water. Stir to mix everything together.

12. The butter will be a big blob but it will melt as the soup cooks the pasta and rice. It makes this soup rich and velvety!

13. Place the bowl in the ELB base. Add 3 ELB cups of water to the base, cover and let steam until it shuts off, about an hour.

14. Carefully open the ELB. Stir the soup and check the pasta and rice if it’s cooked through.

15. Serve hot! Enjoy!

Tiger Mochi Maker

One of the ladies at an ELB group I’m in mentioned a blogger making mochi like I did at the beginning of the year. Since I am making some that day, I figured I’ll just write about it too.

The holidays got a bit too busy to catch up with writing recipes (even though it was the perfect time as kitchens all over are definitely churning out yummy goodies non stop!). But I was able to snap photos (and videos!) along the way and I hope you’ll enjoy this read! Oh the beautiful chaos in the kitchen!

Mochi is traditionally eaten in Japan during New Year’s, it is added to soups like Ozoni, (made with chicken, vegetables and mochi) or Zenzai (sweet red bean soup with soft mochi pieces swimmimg around!). We also have kiri mochi, which is made from pounded sweet rice shaped into bars and dried. You toast them up till they puff and dip them in soy sauce. Yummy!! I like all those but I love stuffed mochi even more!

I had always used this brand of sweet rice so I’m not sure if there is any other brand out there. Filipino cuisine uses a sweet, sticky rice too but the appearance is different. These ones are almost round and the Filipino “malagkit” rice is more elongated. Not sure if they are interchangeable as I have both but never tried to replace one with another.

For my New Year’s mochi, I start the process a day before I want to cook and pound the rice.

I use 10 cups of rice. This is the maximum amount this mochi maker can handle and since I’ll be bringing some over to my mom, I figured I’ll just make a big batch. You HAVE to use the rice measuring cup that came with the mochi maker. Do not lose it! *If you ever lose it though, know that 1 rice measuring cup = 3/4 US standard dry measuring cup. 😉

Wash the rice thoroughly, until water runs clear. To do this, you place the measured rice in a big bowl, fill with water and run your fingers through it. I try to gently rub the grains together too. Drain and refill the bowl. Do this several times. Then fill the bowl with water one last time. Soak for at least 6 hours, ideally overnight.

After soaking, drain the rice and place in a strainer for 30 minutes. This is very important as you do not want the rice too wet which will make your mochi too soft.

Add 2 1/2 cups water in the base of the mochi maker. This amount corresponds to the amount of rice you’ll cook. There is a chart in the manual.
*Reminder that you HAVE to use the cup that came with the machine to measure both the rice and the water.*

Next, attach the mixing bowl, twisting to set it in place. Place the impeller in the bowl, turning it, until it settles in.

Carefully place the drained rice into the bowl.

Level out the top if needed.

Place the plastic cover over the bowl.

Press “steam”. It will steam until the reservoir runs out of water. When it is done, the buzzer beep loudly. Press “off”.

Remove the plastic cover, and test a grain of rice for doneness. You should be able to crush it between two fingers.

Press “pound” and start a timer. This time, you DO NOT use the cover. This step will also eliminate excess moisture as it pounds the rice, so leaving the cover off is necessary. It’ll take about 10-15 minutes. See the videos below to help you estimate the texture.

This is what the rice looks like in the beginning.

After a few minutes, a ball starts to form and the texture starts to look smoother.

In about 12 to 15 minutes, you would have a homogenous, smooth looking ball.

There should be no rice grains visible, just one smooth, white mass.

Sprinkle katakuriko (or cornstarch)on the main cover of the mochi machine or a clean board.

Carefully invert the hot mochi onto the prepared surface.

Lift the hot bowl with pot holders and gently nudge all of the delicious mochi out of the bowl. Go ahead and taste some! I pinch a few pieces here and there and fill with an. See the last photo! Work (and eat!) quickly as this mochi hardens really fast.

You can roll them in the tray, sprinkling with katakuriko or cornstarch as needed.

Or you can transfer them into 2 plastic, one gallon freezer bags, snipping both sealed ends so you can roll the mochi all the way to the corners.

Leave bag open after rolling to dry the mochi a little. I leave it for several hours, turning it over and loosening the plastic a couple of times. Then remove from bag, cut into pieces and let dry a few more hours.

Store these in the freezer as it will get moldy rather fast at room temperature.

To serve, toast the squares until puffed up and toasty. I use my toaster oven for this but a pan on the stove over low to medium heat, or even just microwaving till it puffs up, are both good too. Dip in lots of soy sauce and enjoy!

Mochi stuffed with An. 😋

Follow me on Facebook: https://www.facebook.com/At-Home-With-Theresa-100255438410727/