I love the convenience of bottled simmer sauces that are becoming available at the grocery stores. They are truly life savers for when you come home late from work and need something on the dinner table real quick. The trick is finding out which ones you like, which means trying out a few brands.
I’ve always been lucky with almost anything I get at Trader Joe’s. They’re reasonably priced and always delicious, but sometimes you get hooked but you can never get it again. I had some favorite cheeses and sauces that was not available anymore when I came back for more. Sad.
So if I see something I want to try, I usually buy a couple to start with. They do have expiration dates so I cannot really get a dozen or so as we will get tired of it if I cook it too often. 😊
So…this is my most recent find!
I’ll cook this with some cut up chicken, garlic, onions, carrots, potatoes, zucchini, mushrooms, and a couple of bell peppers from the garden.
You can definitely eyeball the amounts and adjust anything to your taste.
Begin by preparing all of your ingredients. I used the following:
1-2 tablespoons oil
3 garlic cloves, peeled and minced
1 onion, peeled and diced
1 pound of chicken breast, cubed
1 big potato, peeled and diced
1 carrot, peeled and diced
1 zucchini, trimmed and cut into half moons
A handful of mushrooms, chopped
1 red bell pepper, diced
1 bottle of Trader Joe’s Yellow Curry Sauce
Water
Freshly cooked rice and chopped cilantro, for serving
1. Heat oil in a saucepan. Sauté garlic and onions until lightly browned and fragrant, about 5 minutes.
2. Add the chicken and cook until lightly browned. Next add the potatoes and carrots. Stir and cook for a few minutes.
3. Add the zucchini, mushrooms, and bell pepper.
4. Pour the curry sauce over. Fill the bottle halfway with water, cover and shake to get every last bit of the delicious sauce, open the bottle then pour contents into the pan.
5. Stir the mixture and cover with a lid. Lower heat to medium low and simmer until chicken and vegetables are done, around 10-20 minutes.
6. Serve over freshly cooked, hot rice. Top with chopped cilantro. Enjoy!
We’re making Indian food today! And it’s vegetarian too!
This recipe is made from potatoes and peas, cooked in a tomato based sauce with garlic, ginger, onion, cumin, coriander, etc. then sprinkled with cilantro just before serving. Yum!
I like to cook the spices with oil on the stove to release all the lovely aromas, caramelize the onion, and take the edge off the garlic and ginger. I think this little extra step will give you a more flavorful dish than my usual “place everything in the bowl and cook” recipes. Specially since this is a vegetarian dish, I definitely encourage you to follow this step.
After sautéing the spices, you can cool and add them to the bowl and take it to work if you’re cooking at work. Otherwise, do as I did and just add it to the prepared vegetables in the bowl and cook. It will taste amazing, I promise!
*NOTE that this recipe uses regular sized measuring cups, NOT the tiny Itaki cup, unless specified.*
*An optional step is to combine the spices and salt in a food processor and whirl until it becomes powdery. I only had whole coriander seeds, so I crushed it then run it through the food processor with the other spices to blend. *
1. Heat a pan over medium low heat. Add oil, then add coriander, cumin, paprika, garam masala, turmeric, and ginger. Stir until fragrant. Add onions and garlic. Sauté until wilted and slightly browned. Set aside. *You can leave it in the refrigerator at this stage and add the potatoes, peas, and water when ready to cook.*
2. Place potatoes and peas in the big bottom bowl of the electric lunchbox. Pour the sautéed mixture over and add tomato paste and salt.
3. When ready to cook, pour 1 cup water in the bowl and stir everything together until the tomato paste dissolves.
4. Place the bowl in the base of the electric lunchbox and add 120 ml water to the base. Cover and let steam until done, about 55 minutes.
5. Carefully open the lunchbox and check the potatoes for doneness, it should be tender yet not falling apart.
6. Sprinkle with cilantro and serve with rice, or flat bread.
Dinner is always a “what to cook” problem for me. If I am craving something then the battle is half won, as I would have to only make sure I have all (at least most) of the ingredients on hand so that I do not have to make a last minute dash to the grocery stores. The time I get out of work is a bad time to swing by the stores as a lot of people are there too, looking for what to serve for dinner.
So I usually keep a bottle or two of this curry paste and a can of coconut milk handy. That way, if I have chicken or pork and some vegetables, I can serve curry in half an hour or so.
2 tablespoons canola oil
1 tbsp chopped garlic
1 onion, chopped
1 1/2 pounds chicken breast, cut into cubes
1 cup water
3 potatoes, peeled and cubed
2 carrots, peeled and cubed
2 zucchinis, sliced in half and into half moons
1 package (8oz) mushrooms, sliced
1/2 c frozen peas
1 can (13.5oz) coconut milk
1/3 – 1/2 cup thai red curry paste (to taste)
2 teaspoons chicken bouillon (optional)
Chopped cilantro, for serving
Rice and/or flatbread, for serving
Heat oil in a wok or deep saucepan. Add garlic and cook until light brown. Add onions and cook until soft and browned.
Add chicken pieces. When chicken turns golden brown, add water and stir well. Add potatoes and carrots and stir. Cover and let simmer until potatoes are half done.
Add zucchini, mushrooms, peas, coconut milk, and red curry paste. Start with 1/3 cup and add more towards the end if you want it spicier. Add chicken bouillon if using. Cover and simmer until chicken and vegetables are done.
Sprinkle with chopped cilantro. Serve with cooked rice, or flatbread.
*Please note that the word “cup” in any of my electric lunchbox recipe refers to the little itaki cup included with the lunchbox. It holds 40ml.*
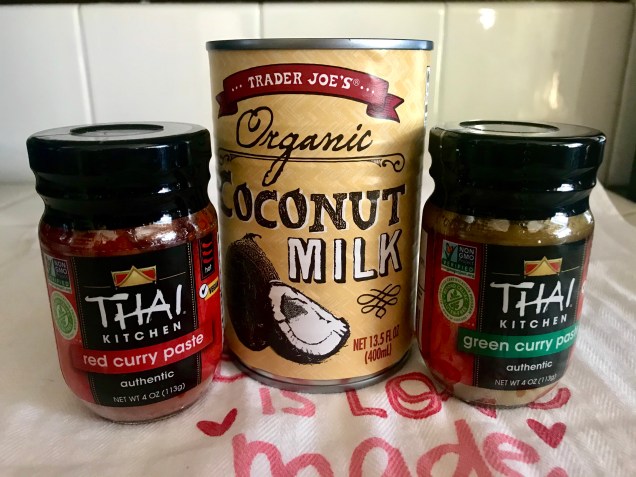
I finally found Thai curry pastes in Walmart Neighborhood Store last week after I had to make my own (with missing ingredients!) green curry paste because I wanted green curry so bad. I got both the green and the red pastes to try. Some of the highly rated ones has shrimp paste in it and since I am allergic to shrimp, I’m glad the only brand available here, Thai Kitchen, is vegan. 🤗
Let the testing begin! I also picked up some coconut milk from Trader Joes. I see lots of curry in my future! ❤️
In the bottom bowl, place the following ingredients:
Beef, cut into small cubes (you can use any meat/tofu if you prefer)
Carrots, small half moons
Potatoes, small cubes
Onions, chopped
Mushrooms, sliced
Green beans, cut into inch long pieces
1-3 tablespoon thai red curry paste(adjust to taste)
3 itaki cups coconut milk
Upper bowl:
2 cups basmati, rinsed and drained
2 cups water
Plus:
3 itaki cups water in base (about 1 hour and 15 minutes steaming time)
The curry was delicious! The bottle has a 3 chili rating for spiciness, but it is not spicy for me, which is good as I want my son to be able to eat the same dish I cook. This test batch in the Itaki is all mine, though.
Love the fact that I can test recipes using this little lunchbox and make just enough for 1 meal. If I love it, I can scale up the recipe. If I do not like it, it’s just 1 meal. This dish is a keeper though! Hope you’ll try it and share if you liked it or not!
I have been playing with my electric lunchbox at home, sneaking in every opportunity to make something yummy with almost no effort. I’ve been making curries and soups as they are easy to put together quickly and most people like it.
I posted this recipe on Itaki and Electric lunchbox Facebook groups. It got several likes and people even made it following the steps I shared. So I am sharing it here as some of my friends do not have a Facebook account (😱)
My type A personality kicked into high gear and I am constantly thinking up recipes to cook in the lunchbox. However, with the pandemic, ingredients are limited and the lines to the grocery stores are long. I will try my best to develop more recipes though as I love it when others learn something from my posts!
In case you have one of these at home, try this recipe that will reward you with a nice, hot meal in about an hour or so. All you need to do is gather the ingredients, dice it, and place them in the lunchbox bowls. Be careful not to overfill the bottom bowl though as you’ll need some space (1 inch at least!) for the smaller top bowl to nest IF you are using it. I got carried away on multiple occasions and had to go and remove some ingredients so that my food will all fit. I know I tried to get more in as this recipe easy and really good!
*Please note that the word “cup” in any of my electric lunchbox recipe refers to the little itaki cup included with the lunchbox. It holds 40ml.*
For the big, bottom bowl:
1/2 Zucchini, sliced in half lengthwise, then in half moons
1 Potato, peeled and diced into 1/2 inch cubes
Onion, diced (about 1 tablespoon)
Carrot, peeled and diced
Chicken breast, cut into cubes
3 itaki cups coconut milk (120ml)
2 tablespoon homemade or store bought green curry paste
For the smaller bowl:
2 cups basmati rice, rinsed and drained
2 cups water in the bowl with rice
3 cups water in the base
Place all ingredients FOR THE BIG BOTTOM BOWL in the bowl and mix. Place it on the base.
In the smaller, stainless bowl, place the rinsed and drained rice and the 2 cups water. Carefully place over the bigger bowl in the base.
Pour 3 cups water in the base and place the cover over everything and snap the clips in place.
Let it steam until the light turns off. Try not to peek as it will delay the cooking of the meal. Everytime you open the lunchbox, you are adding more time for your lunch to cook as it loses heat and steam.
I didn’t realize that a lot of people have this Electric Lunchbox. It was an impulse purchase for me because it was so cute! I mean, just look at it! 😍
One thing I know is that it took a little trial and error for me to be comfortable using it. The instructions included were a little vague. But I like challenges, so I dove right in!
Little experiments followed…(something I like to do as I am a scientist by profession) until eggs, soups, curry, and white rice were cooked just the way I like it. Records were kept, timers were used, and after all that, I just had to share it with others so that my findings won’t be in vain. 😊
Here are a few things I learned after tinkering with this lunchbox for a few weeks. Hoping to help others gain confidence in trying their own recipes in it.
1. *Please note that the word “cup” in my electric lunchbox recipes mostly refer to the little itaki cup included with the lunchbox. It holds 40ml.* This cup also has a handy egg piercer right on the bottom of it. Careful – as it is a bit sharp.
**I recently changed this to “uses regular cups, unless stated” since I’ve been making more than just main dishes in it.
2. Have a “prep day”. Set aside an few minutes or so to cut up meats and veggies and bag them individually in little portions. This would be easier done right after purchasing groceries. They can then be stored in the freezer for longer storage or in the refrigerator if you’d use them up soon. Frozen food can be moved to the refrigerator to defrost the night before you need it.
3. White rice always cooks perfectly when I use an equal amount of water in the rice bowl (usually 2:2) and at least 2 cups water in the base. Make sure to rinse the rice and drain before adding the measured water. You don’t have to drain every last drop, it’s quite forgiving.
4. Simmer sauces. There is an abundance of simmer sauces available in the grocery stores right now and most that I had tried were good. Just place your meat, tofu, and/or veggies in the bowl, top with a generous pour of the simmer sauce and you’re good to go! Salsa verde with chicken is great too!
5. Curry pastes and coconut milk. My favorite combo! Top any meat, tofu, and vegetables with a couple of spoonfuls of curry paste and 2-3 little cups coconut milk (basmati rice in top bowl!) and you’ve got yourself a delicious meal! Thai Kitchen brand tastes great!
6. Japanese Curry Mixes. These were the ones I experimented with in the beginning as I am very familiar with it. So easy! Add cut up chicken, pork, or beef in the big bowl. Then diced potatoes, carrots, and onions, one square(cube) of curry mix, 2 little cups of water. Place 2 little cups rice with 2 little cups water in the small bowl. Add 2 little cups water to the base, place big and small bowl in base. Cover and steam until it shuts off. Stir curry and serve over rice. Yummy!!
7. Barbecue sauce. Easy to make barbecue chicken when you have this on hand! Just add diced chicken breasts in the bowl and a good squeeze of barbecue sauce.
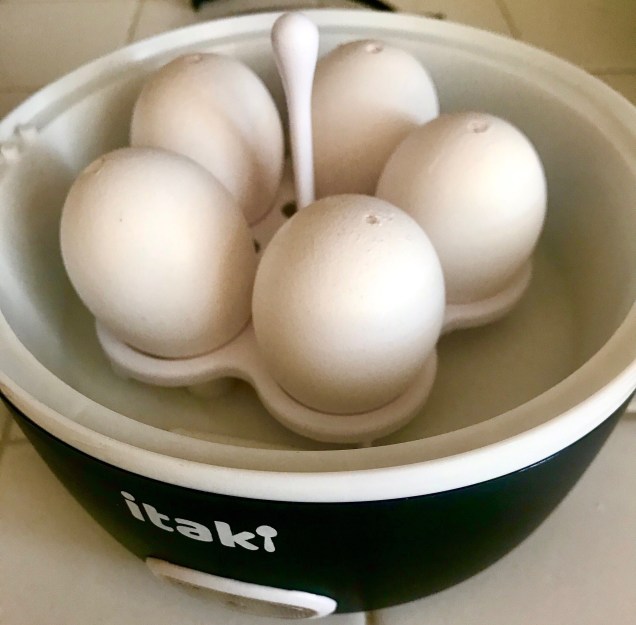
8. Boiled Eggs: I get the perfect hard boiled eggs by piercing the wide end of 5 eggs with the egg piercer (it’s on the bottom of the measuring cup), placing it in the egg holder, pierced side up and onto the base without the stainless bowls. Add 1 little cup water to the base, cover, and let it steam until it shuts off. It will take about 25 minutes. Place eggs in cold water right after cooking.
Hard boiled eggSoft boiled egg
9. Soft boiled Eggs: Take 5 eggs and pierce the wide end. Place in the egg holder and onto the base without the stainless bowls. Add 25 ml water to the base, cover, and let it steam until it shuts off. Place eggs in cold water right after cooking. This will take about 15-16 minutes. If you want the yolks runnier, use less water which equates to less cooking time.
So easy to peel!
10. To peel boiled eggs easily: Tap eggs on the counter multiple times then gently roll between your palm and the counter, exerting gentle pressure. It will peel off like the photo above.
11. Scrambled Eggs: Spray the bowl with cooking spray to make sure egg doesn’t stick. Lining with parchment works too! Cover bowl with foil. 1 little cup water in the base will be enough to cook 2 scrambled eggs in the small bowl.
12. Omelets: place diced mushrooms, bell peppers, chopped ham, turkey, cheese, spinach – whatever you use in your omelet – in the bowl that was sprayed with cooking spray. Beat 2 eggs and season with salt and pepper. Pour over everything in the bowl. Cover bowl with foil. 1-2 little cups of water in the bowl will cook the omelet, depending on how much filling was added.
13. DO NOT use the plastic lid for the stainless bowls WHILE steaming. They are perfect for storing your prepped bowls in the fridge, or for transporting the bowls to your workplace but they must be removed before turning the lunchbox on. Also, you can order extra bowls from the website if you need them to prepare meals in advance.
14. To cook small pasta (macaroni, ditalini, small penne, etc.) in soups, add 1-2 little cups pasta and pour in whatever liquid you are using, leaving about an inch between the liquid level and top of the bowl. 2 cups water in the base would be enough to cook the pasta.
15. 1 little cup (40ml) water in the base creates steam that lasts about 25 minutes in MY Itaki Pro. 2 cups is enough to cook rice, and 2-3 cups is enough to cook main dishes with raw meat (cut into small pieces) with rice in the small bowl. So far, I never had to use more than 3 cups except for one instance I’ll explain next. * Please note that I was informed that it varies from 15-25 minutes for others so please check yours out so you can estimate a baseline time per cup and go from there. I will time my cooking and add times to the recipe so you can adjust the amount of water you use in your base.*
16. Try not to open the Electric Lunchbox while it is steaming. I did it once and it took a lot longer to cook the food and I had to add another cup of water.
17. Use a scrubbing pad to remove deposits from the steamer. I had also used Magic Eraser with the same results. I will likely try vinegar soon and update this post.
*So I did try vinegar and here is the best way I found: after your food is cooked and while the steaming element is still HOT, add a little vinegar to it. Let sit for a few seconds and brush with a toothbrush until all the deposits/stains are removed. Rinse thoroughly. It will look brand new! Do not leave the vinegar too long as it may pit the metal.
18. Make sure to empty the base of residual water and let dry before storing. You do not want mold or bacteria growing in there. I just rinse and wipe them and place the base and cover upside down to dry on the counter.
19. If you want to keep condensation out of your food, line the inside of the foil with paper towel, it will absorb condensation and will help keep your food dry. I usually do this for cheesecake, scrambled eggs, or cakes.
I will add to this list as I find more useful tips. In the meantime, I will be trying to find time to cook in it more and share the recipes with you. Keep safe everyone!