Kolasnittar (Swedish Toffee cookies)

Toffee Cookies….the first time I read about this I can totally imagine it would taste delicious!

I had been reading up on the Swedish tradition – Fika – and everything that goes with it. I started with Kanelbullar, of course, as cinnamon rolls are a favorite in our home.

Next up are these cookies. I love chocolate chip cookies but am always up to try something new, specially when it is traditionally eaten with COFFEE!

This cookie did call for an unusual pair of ingredients, vanilla sugar and Tumma Siirappi, a dark syrup used in Swedish baking. Off to the internet I went searching for a local source of these items. Of course, I can’t find it. I then tried searching for a seller that would ship it to me. And I found one, luckily!

It took a few weeks after receiving the syrups and sugar before I found time to try making the cookies. They were absolutely worth the wait!

Follow me on Facebook: https://www.facebook.com/At-Home-With-Theresa-100255438410727/

Ingredients:

  • 1 cup unsalted butter, softened
  • 1 cup white sugar
  • 1 teaspoon vanilla extract or 1 tablespoon of vanilla sugar
  • 1 large egg yolk
  • 2 tablespoons Dan Sukker “Tumma Siirappi”dark syrup
  • 2 cups unbleached all-purpose flour
  • 2 teaspoons baking soda
  • ½ teaspoon sea salt

Homemade Vanilla Sugar: You can use a new vanilla pod or one that you’ve already scraped off the seeds from. Just place the pod into a container of granulated sugar and let it sit for a week or so. Stir occasionally. And there you have homemade vanilla sugar!

*I ordered the dark syrup – Dan Sukker Tumma Siirappi – and vanilla sugar, from Al Johnsons Swedish Restaurant and Butik (https://aljohnsonsshop.com). It tastes mildly of molasses and honey but not quite the same. I highly recommend trying the real syrup before substituting something else. My son said the cookies remind him of really good cookie dough, while my coworker insists on tasting ginger in the cookie….and I really think the syrup played a part in those flavor profiles.

1. Line 2 large baking sheets with silpat or parchment paper.

2. In large bowl, using an electric mixer, beat together butter,

3. And granulated sugar.

4. Beat in vanilla,

5. egg yolk,

6. and dark syrup until blended.

7. Add in the flour,

8. baking soda,

9. and salt and beat until well mixed.

10. Cover the bowl and refrigerate about 30 minutes or until firm enough to divide into 6 equal parts to roll into logs.

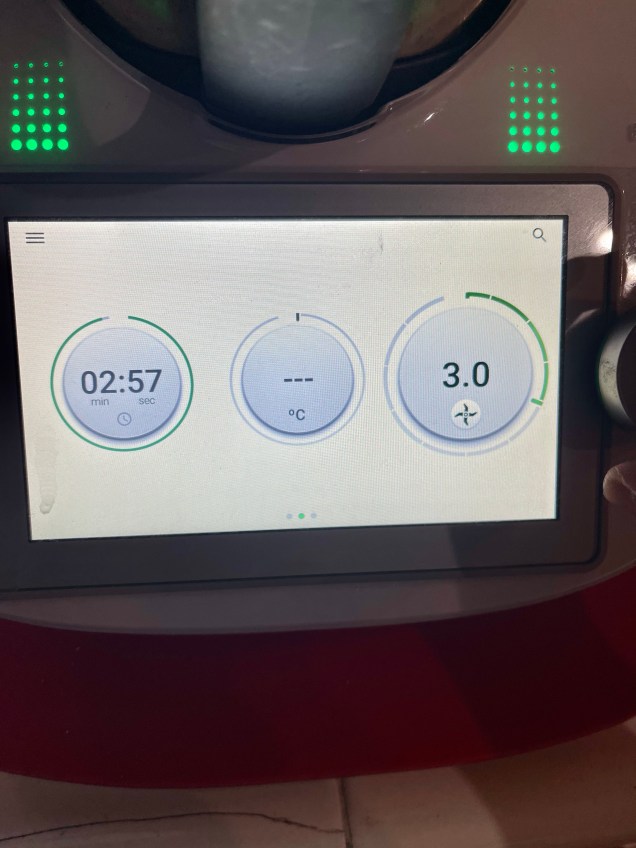
11. Meanwhile, preheat oven to 375F.

12. Roll each part into a log about 9 – 10 inches long on the prepared baking sheets, 3 per sheet.

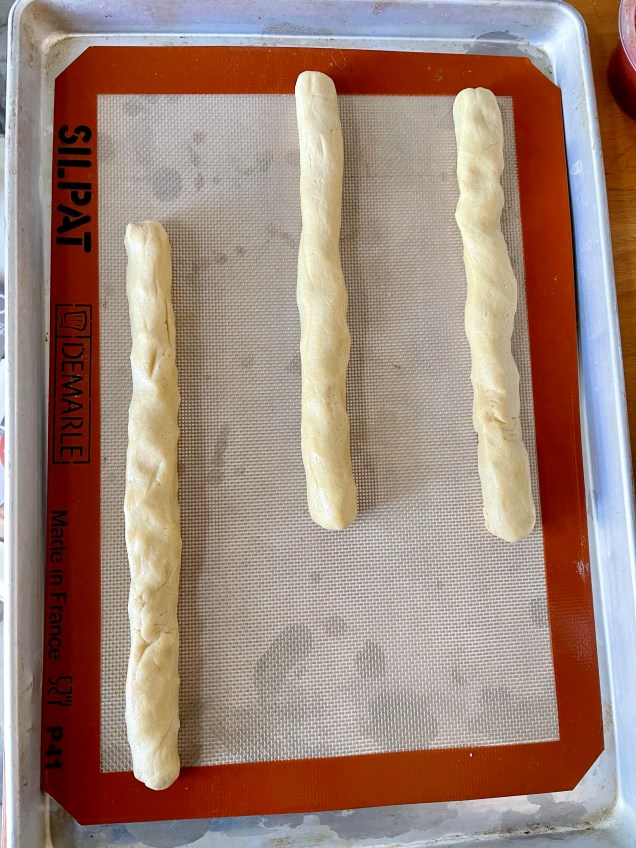
13. Leave at least a 2 – 3 inch space between the logs as they will spread quite a bit.

14. Bake logs for about 12 – 15 minutes or until they are golden brown.

15. Remove from oven and place on a wire rack. If the logs have touched each other during baking, take a long sharp knife and gently push them back, keeping them oval.

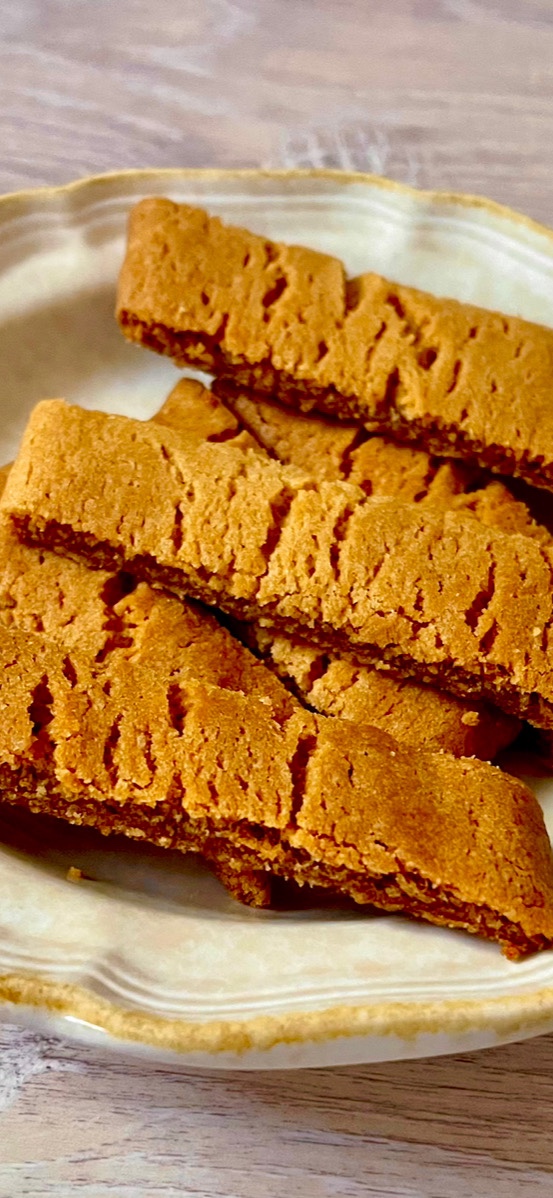
16. While still warm, and using a long sharp knife, cut the logs into diagonal slices about an inch apart. After cutting, remove cookies to wire racks to cool completely.

Chocolate Chip Cookies (the Elon Musk one)

Finally, I was able to write this article. I hope you all will like it!

Tesla. Elon Musk. Bitcoin…..Chocolate Chip Cookies???

A few weeks ago, while on one of my rare break times at work, I came across this article about a Chocolate Chip Cookie that allegedly made Elon Musk go back for seconds. Wait, what? Did I read that right?

So of course, I read the whole article. The baker’s boyfriend works at Space X, and his desk is near Elon Musk’s office. So when the cookies were seen, he asked the bodyguard to get some. And then more.

I just wanted to go home and try the recipe she shared after I was done reading the article. But of course, I had to finish work before leaving.

So, a few hours later, I was able to prepare it. Lucky for me, ingredients for chocolate chip cookies are always in my pantry. 😊

I doubled the recipe so that I could share, and made it in the Thermomix so that it came together really fast.

Ingredients:

1 1/2 cups all-purpose flour
1/2 teaspoon baking soda
1/2 teaspoon salt
1/2 cup (1 stick) cold unsalted butter, cut into 1/2-inch pieces
3/4 cup tightly packed light brown sugar
1/2 cup granulated sugar
1 1/2 teaspoons vanilla extract
1 large egg, at room temperature, lightly beaten
6 ounces bittersweet chocolate chunks

1. Place the butter in a bowl. You can use a stand mixer or a hand held one. I used the Thermomix to make life easier.

2. Add the brown sugar,

3. And the white sugar. Mix together over low speed for 3 minutes.

4. Scrape down the sides of the bowl.

5. Add the vanilla extract,

6. And the egg (eggs in the photo as I doubled the recipe).

7. Mix for about 15 seconds, low speed.

8. Scrape down the sides of the bowl.

9. Stir in the flour,

10. Baking soda,

11. And salt into the butter mixture.

12. Mix on low speed for 10-15 seconds, until just combined.

13. See the texture on the photo above.

14. Add in the chocolate chips, (love Trader Joe’s chocolate chips!)

15. And stir until incorporated.

16. Transfer dough into a container with a lid and refrigerate overnight.

17. Next day, line 2 cookie sheets with parchment paper or silpat. Preheat oven to 350F.

18. Drop 2 tablespoons of the dough onto the prepared sheets.

19. Leave 2 inches of space between the dough balls as these spread out a bit.

*You can also scoop the dough, place it on the sheets, touching is fine, and freeze them. When frozen, transfer to a freezer bag and bake as needed. See above photo.*

20. Bake in the oven for 11-13 minutes, or until edges are golden, but the middle is still soft.

21. Slide the parchment or silicone mats directly onto the counter and cool for a few minutes. When set, about 5 minutes, transfer cookies to a wire rack to cool completely. Or enjoy cookies while they’re warm and gooey!

Milk Chocolate Chip Cookies

Regular version

These make amazingly delicious cookies! I already had a staple recipe for chocolate chip cookies (The Original Toll House recipe of course!) but, like I mentioned before, I love to experiment. I am so glad I did, as this just might be my new favorite!

I made the dough twice, using half of the ingredients for each. One batch was made using sugar free chocolate chips, sugar and brown sugar substitute, sprouted spelt flour and added walnuts. The other half was all regular ingredients, without nuts.

Funny thing is, the sugar free version looked a lot prettier! Enjoy both!

Follow me on Facebook: https://www.facebook.com/At-Home-With-Theresa-100255438410727/

Sugar free version

Ingredients:

1 cup butter, cut into pieces

1 1/4 cup brown sugar

1/2 cup sugar

2 eggs

2 teaspoons vanilla paste

3 cups flour, remove 2 tablespoons of flour and replace with 2 tablespoons of cornstarch

1 teaspoon baking soda

1 teaspoon salt

2 cups milk chocolate chips

Procedure:

1. Preheat oven to 375F. Line 2 large cookie sheets with parchment paper or Silpat.

Line your cookie sheets with silpat or parchment to make it easy to remove the cookies later.

2. In the bowl of a stand mixer, beat butter and sugars for around 5 minutes, until light and fluffy.

3. Add eggs and vanilla and continue beating for about 1 minute.

4. Blend in flour, baking soda, and salt.

5. When a dough forms, stir in chocolate chips.

6. Measure 1/4 cup dough and form into balls, pull them apart and place the halves next to each other, torn side up. Press together to adhere, then place on the cookie sheet, 12 dough balls per sheet. Or make smaller ones using a tablespoon of dough for each.

7. Bake 10 – 12 minutes, just until set and very lightly browned. Rotate cookie sheets, top to bottom and front to back, halfway through baking.

8. Cool on the cookie sheet on a wire rack for 10 minutes before transferring cookies to a wire rack to cool completely. Or even just enough to not burn your tongue and enjoy! These are absolutely amazing warm when the chocolate chips are still gooey and soft! Yum!

8. Makes about 2 dozens.

Sugar Free Chocolate Chip Cookies

We have been trying to use sugar substitutes to reduce my husband’s sugar intake lately.

As you can imagine, I am up to the challenge to create sugar-free sweets as he loves baked goods almost as much as I do.

Chocolate chip cookies are a favorite in my home (as with most homes, I would guess!) so this is the first recipe I tried making. We went to the grocery store and I found our that Hershey’s made sugar free chocolate chips! Hurray! And on the back of the package, there is a recipe for sugar-free chocolate chip cookies that I decided to try, with some modifications.

Most of the sugar-free sweets I had before are dry, and compared to my regular cookies this is a little on the dry size. But my husband loves it so I’m sharing it here in case you’re looking for sugar free chocolate chip cookies recipe as it made delicious cookies.

Ingredients:

1 cup butter, softened

1/3 cup sucralose granulated sugar substitute

1/3 cup sucralose brown sugar blend, packed

2 teaspoons vanilla paste, or extract

2 large eggs

1 cup unbleached all purpose flour

1 cup spelt flour(I used sprouted spelt this time)

1 teaspoon baking soda

1/2 teaspoon salt

1 1/3 cups sugar-free chocolate chips (I used Hershey’s brand)

1 cup chopped walnuts

1. Preheat oven to 375F.

2. Beat butter , sugars and vanilla in the bowl of an electric stand mixer.

3. Add eggs and beat well.

4. Add flour, baking soda, and salt. Mix well.

5. Stir in chocolate chips.

6. Stir in walnuts, if using.

7. Drop teaspoonfuls of dough onto 2 large ungreased cookie sheets.

8. Bake 10 minutes at 375F until edges are lightly browned.

9. Cool for a few minutes before removing to a wire rack to cool completely.

10. Enjoy! This recipe makes 4 dozens so feel free to share!

Bunny/Heart Cake Pops

I recently got back into making cake pops, as I discovered a whole bunch of molds made of silicone and plastic.

I ordered a lot of them to start experimenting again after not making it for about 5 years. I also ordered some fondant molds and luster powders for decorating.

It was an easier process back then. Just mix up a box of cake mix and bake as directed. Cool and crumble into little pieces, mix in about half a tub of ready made frosting and make little round balls. Dip into melted candy melts and cool.

Nowadays there are an infinite number of shapes and designs, one much more detailed than another.

For this post, I am using my bunny mold and heart mold, making cake pops without sticks. I will post a photo of my other cake pop with sticks at the bottom.

If using the ELB to make a cake, follow these recipes https://athomewiththeresa.com/2020/11/01/electric-lunchbox-71-yellow-cake-and-chocolate-cake-boxed-mixes/ Add about a tablespoon of frosting to the cooled, finely crumbled cake to start, adding a bit more as needed to achieve a play dough like consistency.

Follow me for more recipes for the ELB!

See and order Itaki’s products here! https://www.itakico.com/theresa

Follow me on Facebook: https://www.facebook.com/At-Home-With-Theresa-100255438410727/

You will need the following:

A silicone mold with the shape of your choice

A box of cake mix, any flavor you like (I used chocolate)

The ingredients needed to prepare the cake (usually eggs, oil, and water)

A tub of ready made frosting (I used Butter Cream and Cream Cheese flavored frosting)

Chocolate or candy melts

Sprinkles, edible glitter, metallic spray, any other decoration as desired

1. First, you prepare the cake mix according to the directions provided on the box.

2. Pour into a greased 13×9 pan and bake as directed on the package.

3. Cool cake completely on a wire rack.

4. For these type of molds, you’ll first coat them with a layer of melted chocolate or candy melts, fill it with cake pop mix after it sets, then add another layer of chocolate or candy melts to seal.

5. To do that, melt some chocolate or candy melts in a microwave safe bowl in 30 second increments, stirring until melted and smooth. Pour about 1 tablespoon into the mold and work it up the sides with the back of a spoon. Try to coat the inside of the mold evenly. Refrigerate for 10 minutes or so to set. You can add another, thin layer to reinforce the shell if needed after it has set. Return to the fridge to set again.

6. While the shell is in the fridge, place the completely cooled cake, cut into pieces, in a food processor and pulse until finely crumbled.

7. Transfer to a bowl.

8. Add about half of the frosting and mix well. You want it to have a consistency similar to play dough.

9. Take the chocolate shells from the fridge and fill with cake pop mixture.

10. Press gently but firmly to fill throughout the mold.

11. Make sure to leave some space on top for another layer of chocolate or candy melts.

12. Spoon about 1 tablespoon of melted chocolate or candy melts over the filling.

13. Smooth out the top with the back of a spoon then a straight edged spatula to remove excess.

14. Place in the refrigerator to set, about 30 minutes or so.

15. Carefully unmold the cake pops. Tada! Aren’t they beautiful?

16. Pictures at the bottom are the traditional cake pops that have sticks.

These make the perfect birthday cake for our current Covid-19 situation. They’re individually portioned and easy to wrap up and give out.

I hope you’ll like these!

Peanut Butter Blossoms

A peanut butter cookie rolled in granulated sugar, and topped with a Hershey’s Milk Chocolate Kiss!

This was one of my favorite cookies growing up. I think I first saw it in a magazine, a Betty Crocker Cookbook, or in a Hershey Chocolate Cookbook. I love milk chocolate so I made it, and again, and again.

I haven’t made it in a long time (maybe over a decade!) so since I was off for 5 days partly because of my second Covid-19 vaccine, I planned on baking a batch, excited to see if it still tastes the same as it did before. I wasn’t well after my Thursday vaccination (like the first dose, only not as bad) but was well enough on Valentine’s Day, so I made it then.

It didn’t disappoint at all. My son peeled the kisses but needed to do some math problems so I made the cookies myself. It was quick and easy, although I would recommend using an electric mixer because the dough is quite stiff.

For the peanut butter, feel free to use crunchy or smooth, whichever you like or have on hand. I like crunchy but keep some smooth PB in the pantry to use for sate sauce and Asian noodles. I used crunchy PB, as I like the crunch it lends to the cookies.

Ingredients:

1/2 cup butter, softened

1/2 cup sugar

1/2 cup brown sugar, packed

1/2 cup peanut butter

1 large egg

1 1/2 cups all purpose flour

3/4 teaspoon baking soda

1/2 teaspoon baking powder

Sugar, to roll dough in

36 Hershey’s Kisses, unwrapped

Procedure:

1. Preheat oven to 375F.

2. In a bowl, place butter,

3. Sugar,

4. Brown sugar,

5. Peanut butter,

6. And egg.

7. Beat well using an electric mixer , until combined and smooth.

8. Add flour,

9. Baking soda,

10. And baking powder.

11. Beat well until mixed.

12. Scoop up about a tablespoon dough and roll into a ball.

13. Drop into a bowl with granulated sugar. Roll to coat.

14. Place in an ungreased cookie sheet.

15. Repeat with remaining dough, making 36 balls.

16. Line them up 2 inches apart on 2 cookie sheets. They will spread a little as they bake.

17. Bake at 375F for 8-10 minutes, until light golden brown.

18. Immediately press a chocolate kiss in the middle of each cookie.

20. Remove cookies from cookie sheets and onto wire racks.

21. Cool completely.

22. Serve! You can also drizzle cooled cookies with melted chocolate. Makes 36 pieces.

Portuguese Milk Tarts (Queijadas de Leite)

Beautiful to look at and a perfect bite sized dessert, Queijadas de Leite, will be your next favorite dessert!

They’re light, just sweet enough, creamy inside, and crunchy on the outside. I can’t stop at 1…or 5!

Lucky for me these are truly easy to make and I’m pretty sure you have all the ingredients needed in your pantry and refrigerator. Easy and delicious! My perfect combination!

Makes 24 muffin sized tarts

2 cups sugar

1 cup flour

4 eggs

1/2 cup melted butter

3 3/4 cups whole milk

1 teaspoon cinnamon

3 tablespoons sugar

1. Preheat oven 400F. Grease a 12 cup muffin tray generously.

2. In a large mixing bowl, combine sugar and flour. Make a well in the middle and add eggs, butter, and milk.

3. Whisk until blended and no dry chunks remain.

4. Fill prepared muffin pans with about 1/3 cup of the mixture (about 3/4 full). Bake 30-35 minutes until tops are golden brown.

5. In the meantime, mix together 1 teaspoon cinnamon and 3 tablespoons sugar in a small bowl.

6. Remove from pans and sprinkle with cinnamon sugar mixture.

7. Cool completely. Enjoy!

Meyer Lemon Bars

My coworkers know how much I love to be in the kitchen, dreaming up yummy things, so when one of them had a Meyer lemon tree full of fruits, guess what I got? A bag full of fragrant, beautiful, shiny Meyer lemons! Just look at the photo below..swoon!!

Since I tend to barter with baked goods with my coworkers, I asked her if she wanted a lemon cake or lemon bars and she said “lemon bars!” without hesitation.

I bartered a loaf of sourdough bread for these eggs!

Lemon bars it is! Meyer lemon bars! *lemon cake in the ELB recipe link here – https://athomewiththeresa.com/2020/11/26/electric-lunchbox-72-lemon-cake/

I do have a dwarf Eureka lemon tree in the backyard that produces some lemons as it is still small but Meyer lemons are totally delicious! They have a floral scent, like orange blossoms, mixed with lemon that is just so refreshing and mild.

So, back to my lemon bars. This recipe makes a big 13” x 9” pan so you’ll have enough to share but I’d totally understand too if you eat half a pan while cooking dinner after the bars cooled off a bit… because I just can’t stop eating it! I do not like cloyingly sweet desserts so this has just enough sweetness to play up the tart, floral taste coming from the lemon juice and lemon zest.

Of course you can cut all the ingredients in half and bake this in an 8×8 pan. AND, if you do not have Meyer lemons, regular store bought lemons make the perfect substitute!

Ingredients for the Crust:

1 cup butter, at room temperature

1/2 cup sugar

2 cups unbleached all purpose flour

1/4 teaspoon salt

Ingredients for Meyer Lemon Filling:

6 large eggs

2 3/4 cups sugar

2 tablespoons Meyer Lemon zest (from 4 – 5 lemons)

1 cup Meyer lemon juice (from 4 – 6 lemons)

1 cup unbleached all purpose flour

1/2 teaspoon baking powder

1/4 teaspoon salt

Confectioner’s sugar for dusting

Procedure:

1. Preheat oven to 350F. Grease a 13” x 9” pan with non stick spray. You’ll have a cookie crust so there is no need to line the pan but feel free to do so if you want to.

2. Place butter and sugar in a medium bowl.

3. Cream together with a hand mixer until fluffy, about 2 minutes. You can also use a stand mixer.

4. Add flour and salt to the bowl.

5. Beat until combined and texture resembles sand. See the texture in the photo above.

6. Transfer mixture to the prepared pan.

7. Press firmly onto the bottom of the pan. I use a measuring cup to press the crust firmly on the bottom of the pan, then my fingers for the corners and edges.

8. Bake at 350F for 15 to 18 minutes, until lightly browned.

9. Transfer to a cooling rack while you prepare the filling.

10. Gather your ingredients for the filling.

11. Zest your lemons first.

12. Then cut the lemons in half and squeeze the juice into a measuring cup. Inhale deeply as this is sweet, summery, all natural, refreshing aromatherapy for free! 😊 It’s the little things that count!

11. Wipe out the bowl you used for the crust (one less bowl to wash!) and in it, add sugar, lemon zest, lemon juice, flour, baking powder, and salt.

12. Add the eggs and beat until blended.

13. Pour the mixture over the crust.

14. Bake for 30 to 35 minutes more, until middle is set and the top looks dry.

15. Cool completely on a wire rack before cutting into pieces. Hint: If you chill it overnight, it cuts cleaner and easier. The photo above are of the lemon bars I cut when they were still warm…so they didn’t look too pretty. Still delicious though!

16. Enjoy!